

stamps:
Nature’s Beauty
Inspired Thoughts
paper:
Misty Moonlight
Basic White
Hydrangea Hill Mercury Glass Acetate
Beauty of the Earth Designer Paper
ink:
Misty Moonlight
Smoky Slate
Memento Tuxedo Black
accessories:
medium envelope- Basic White
Baker’s Twine Essentials Pack
sponge daubers
dimensionals
TIP:
The white flap part is 3 ½” x 6 ¾”. It is scored at 2 ¾”.

stamps:
Amazing Silhouettes
Biggest Wish
paper:
Soft Succulent
Evening Evergreen
Very Vanilla
ink:
Soft Succulent
Evening Evergreen
accessories:
medium envelope- Very Vanilla
Bark embossing folder
TIP:
You can emboss the front by putting just the front part of the card base in the embossing folder OR embossing a separate piece of Soft Succulent card stock and then attaching it to the front.

stamps:
Artistically Inked
paper:
Magenta Madness
Pale Papaya
Basic White
Expressions in Ink Specialty Paper
ink:
Magenta Madness
Pale Papaya
Memento Tuxedo Black
accessories:
medium envelope- Basic White
punch-Double Oval
Loose Flower Flourishes
mini glue dots
Liquid Multi Glue
dimensionals
Take Your Pick
TIP:
When stamping the inside, stamp off to Magenta Madness to get a lighter color.
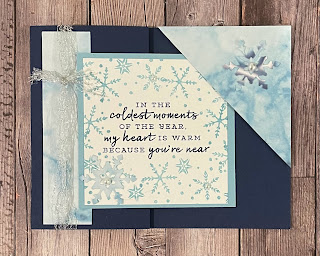

stamps:
Snowflake Wishes
paper:
Night of Navy
Balmy Blue
Basic White
Simply Marbleous 6 x 6 Designer Paper
ink:
Night of Navy
Balmy Blue
accessories:
medium envelope- Basic White
Pearl Basic Jewels
Metallic Mesh ribbon
So Many Snowflakes dies
Liquid Multi Glue
dimensionals
Take Your Pick and die brush tip
TIPS:
-This fun fold is called a Corner Tuck Card.
-Only add 3 dimensionals to the corners on the triangle piece.
-The retired Adhesive Backed Snowflakes also look nice on this card!
Corner Tuck Card
1. Cut the card base (4 ¼” x 8”) and score at 2 ½”.
2. Cut a 3” x 3” piece of Designer Paper in half, corner to corner. Add a piece of card stock to the back to add stability. Attach to the top right corner of the card base with 3 dimensionals (one in each corner).
3. Fold score line on card base. Add Designer paper, ribbon, etc to the flap.
4. Stamp words/designs on 3” x 3” Basic White card stock. Attach to a coordinating piece of 3 ¼” x 3 ¼” of card stock. Attach to the flap using adhesive on the left side only. Stampin’ Seal + works well for this because the flap will be lifted and tucked under.
5. Attach the 3” x 3” piece of Basic White card stock to the inside. Place it under the Designer Paper triangle corner and centered so you can’t see it when you close the card.
Thanks for stopping by!
Happy Stamping!
Patrice