Sunday, April 26, 2009

Jaron's Color Challenge


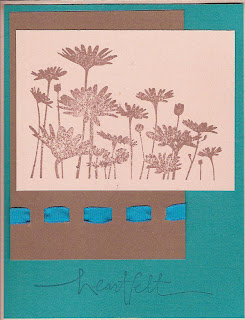
This is the card I made for Jaron's Color Challenge.  You can find his blog here.  I had to do a mini-cheat because I don't have any Soft Sky.  I used Bashful Blue instead and I think if I didn't say anything everyone would just think it was Soft Sky. :)  If you have some Old Olive, Taken with Teal AND Soft Sky, make the same card and let me know how it turns out!  This layout for a card is so quick and easy.  And since I should really be packing my stuff for a workshop tonight I needed quick and easy!

Here's what I used:
stamps: Sincere Salutations, Best Wishes & More
ink: Old Olive, Taken with Teal
paper: Old Olive, Taken with Teal, Bashful Blue
acessories: Old Olive brads, stampin' dimensionals.

Friday, April 24, 2009

Bloggers Challenge-Alter it! April 24, 2009

My first attempt at this week's Bloggers Challenge was this clothespin. I am not 100% happy with the way this turned out. I wanted to see if I could come up with something I like even better, so I tried again!

My second try at this week's Bloggers Challenge is this butterfly can. I am happier with this than then clothespin, but something still wasn't quite right.

Here is what I finally did for the Bloggers Challenge-Alter it! I am going to a bridal shower next weekend and I wanted to do something special for her gift. It's been sitting on my kitchen counter for a week, so I was glad we had this challenge so I actually got it done!

I used some of the things from the Pretties Kit on the top. I like the way the hat pin looks! I can rarely think of an idea to use these hat pins for, but I was happy with how it turned out here.

I added some of the flowers to the side. I used the Big Shot to cut out/emboss the flowers and then put a half pearl from the Pretties Kit in the middle. Hopefully I will have time to fill the bowls with something yummy! We're each going to give our favorite recipe. I want to make some of my favorite cookies and stick them in the bowls before next weekend.

Remember to check out the other projects for the Bloggers Challenge by cicking on the link on the right.

Thursday, April 23, 2009

Marker Club cards

These are the cards we made for my Marker Club. We've been learning all kinds of great ways to use our markers, besides the obvious-color in an image! Does this first card look familiar? It's from a Bloggers Challenge not too long ago! We made the pearl from the Pretties Kit with a Sage Shadow marker and clear emboss powder. It's not hard to do, but a little awkward making the pearl stay put while you heat the embossing powder! We used the Color Spritzer Tool on the Sage Shadow card stock on the top of the card, also.

The ribbon on this card is the satin ribbon from the Occasions Mini. We colored it with an Always Artichoke marker. It dried really fast! To make the stripes in the flower, we inked up the flower with Regal Rose (just to make sure the entire background was covered). Then we took a Regal Rose marker and dipped the tip in Rose Red ink from a reinker. Then when you use the side of the marker it makes the stripes! We ran the side of the marker across the flower stamp and stamped it on the card stock. Just make sure you scribble your marker on scrap paper after you use the reinker.


For this first card, we used the Color Spritzer Tool. First we spritzed Chocolate Chip and More Mustard on the rectangular piece of Whisper White. Then we inked up the bird with More Mustard and used the Color Spritzer Tool to add Chocolate Chip to the bird stamp. And then we stamped it on the card stock.

If you want to learn more about joining a Marker Club (or any other kind of Club), just let me know!


Saturday, April 18, 2009

April Workshop cards


The first card is a split negative card. I stamped with Craft Green Galore ink on the black card stock and let it dry. The other half of the flower is stamped in Basic Black. After I stamped the images, I cut them in half and used the other half to make another card! I used pieces of card stock that were the same size as the wood block, making it easier to line them up when I was putting them on the card.


I used the Big Shot and Simple Flower embosslit
to make the flowers on the second card. I love how easy it is to cut and emboss at the same time! I used a Sponge Dauber and some Taken with Teal ink to make the Apricot Appeal flowers pop a little.


This make-n-take was made with Blush Blossom, Taken with Teal, and Close to Cocoa card stock. I used the double rectangle punch to make an even line of rectangles along the bottom. Punch the first one, then move the punch over so you can see one of the holes. Punch again and repeat until the end of the paper. Then weave the ribbon through!


This make-n-take card was inspired by a card my upline sent me. Hers had a picture of a snowman standing near a tree, and I wanted to make mine make me think of warmer weather! I stamped the flower/circle image in Tangerine Tango and Pacific Point ink. Then I punched them out with the Scallop Circle and 1/2" circle punches. I used the crop-a-dile to set the eyelet and make small embossed circles on the corner of the small square. The Big Shot made this card quick and easy, too! I love that Top Note die!

Friday, April 17, 2009

Blogger's Challenge April 17, 2009

The Blogger's Challenge this week was a Color Challenge. When I saw the Always Artichoke, Sage Shadow, Chocolate Chip, and Sahara Sand together, I thought of the Baroque Motifs set right away! To make the pearl a sage color, I colored it with a Sage Shadow marker, dipped it in clear embossing powder, and heated it. Then I repeated that step to make the sage color a little darker. I roughed up the edges of the Sage Shadow card stock and used Stampin' Dimensionals to make some contrast between the 2 Sage Shadow card stock pieces.


Here's what I used:
stamps: Baroque Motifs, Warm Words
card stock: Always Artichoke, Sage Shadow, Chocolate Chip, Sahara Sand
ink: Always Artichoke classic ink pad, Sage Shadow marker
accessories: Color Spritzer tool, word window punch, ticket corner punch, Stampin' Dimensionals, mini glue dots, Pretties Kit, clear embossing powder, heat tool

Monday, April 13, 2009

Stamp Club, April 13, 2009

This make-n-take used the Eastern Blooms and Warm Words stamp sets. The ribbon is run through the frame, and then held in place by the brad. I also talked about how to stop the ribbon from fraying. Light a lighter and run the flame close to the edge of ribbon for a very short time. It will "melt" the end of the ribbon, and then it won't fray! It's a great trick I learned at the Stampin' Regionals in Minneapolis last weekend!


This make-n-take could be made this way (up and down), or on its side. To make the swirl, first run the Texturz plate through the big shot, then rub your sanding block over it. It makes the swirls pop out! If you use a template, you can get good placement of you flower in the oval. I just used some copy paper for my template!


This card was made using the shaving cream technique. Put some shaving cream on a plate or a plastic box. Put a few drops of reinker on top and swirl around. Then mush you card stock into the shaving cream. Wipe off the excess shaving cream, let the card stock dry, and attach to your card. I used Whisper White card stock, but Glossy White card stock is used often for this technique, also. I also used a little Crystal Effects in the center of the flower to give it a little shine!


I demonstrated the Split Negative Trees card. I used Craft Whisper White and Basic Black ink to stamp the trees. Then I cut the image in half and put "opposite" sides together.


Friday, April 10, 2009

Blogger's Challenge-Technique


The Blogger's Challenge for this week is to use any technique. I did the wood grain look. I don't do this technique a lot, but I think it looks so neat! Plus, it makes a flower card look a little more manly, so I can use my flower stamps for guy cards!

To do this technique, choose a few ink pads in "wood grain" colors (such as Chocolate Chip, More Mustard, Creamy Caramel, and Really Rust). Use a sponge to drag the color over your neutral colored card stock. Repeat with different colors until you get the look you want.

To make the flower on this card, I embossed the flower, then used my sponge to add color around it. I used the same colors as the wood grain part, and I "bounced" my sponge all over.

Click on the Blogger's Challenge box on the side to see a list of other Blogger's Challenge members. Click on their name to see what techniques they tried this week!

Wednesday, April 8, 2009


I wanted to do some stamping tonight, and I also wanted to make some cards with the extra supplies from a recent Stamp-A-Stack.  I made 15 cards in no time!  I hope these cards inspire you to make a few cards yourself!

Monday, April 6, 2009


This card was one of the make-n-takes at the Stampin' Up! Regionals in Minneapolis, MN on Saturday, April 4th.  Regionals is an event put on by Stampin' Up! for demonstrators.  I learned a lot of great tips for workshops, and a TON of great stamping ideas!  It is one of the reasons I love to be a SU demonstrator!

The stamp set is Soft Summer and is in the Occasions Mini.  I thought I had enough flower sets, but after using this one, I think I may have to add one more to my collection!  The directions said to use markers to ink up the solid part of the flower stamp and then stamp it, but I decided to color the flower in with some markers (More Mustard, Old Olive, and Ruby Red) and then use my blender pen to blend the colors.  This was a fun, easy, and quick card!

Thursday, April 2, 2009

Bloggers Challenge, April 3, 2009

This card is for the Bloggers Challenge.
Here's what I used:
stamps- Flight of the Butterfly
card stock- Perfect Plum, Mellow Moss, Barely Banana, Whisper White
Classic ink- VersaMark, Barely Banana, Mellow Moss
accessories- Stampin' Dimensionals, Mini Glue Dots, Whisper White organza ribbon, 1 3/8" circle punch, 1 3/4" circle punch


March of Dimes Stamp-A-Stack

These cards will be made at the upcoming Stamp-A-Stack on April 20, 2009 that will benefit the March of Dimes March for Babies. It will be held at Mountain Bay School in Weston, WI from 6:00 - 8:00 PM. The cost is $21 ($10 of this will benefit March of Dimes). Reservations/payment (cash/check) must be received on or before April 13th. To register, you can just send payment with a note saying what it is for. I can also send you a registration form. Hope you can make it! Attendees will make one birthday card and 3 of each of the other cards (10 total).


Wednesday, April 1, 2009


I finished a can of almonds and I thought...,"I should stamp something on this!"  I used Raspberry Tart DSP on the can.  I made it stick with ModPodge.  The card stock is real red, cameo coral, and whisper white.  I stamped the flowers with StazOn jet black and colored with real red, cameo coral, and kiwi kiss.  Now I need to fill it with a yummy treat!